Latest batch of remastered 15mm FoW-compatible scenic bases!
15A05CB - 4 different Medium/Light Artillery scenic bases (rural)
15A06CB - 4 different HMG/mortar scenic bases (rural)
15A17CB - 2 different large heavy mortar scenic bases
These are all actually finished and in production now (images are of actual production casts) and will begin to ship to retailers shortly!
Now I only need to find the time to paint the samples... :)
Cheers!
Claudio
Showing posts with label base. Show all posts
Sunday, 31 March 2013
Monday, 18 February 2013
15mm fortified camp (part 3)
Painting started!
This is what I call "foundation painting", basically flat colors using miniature colors, followed by a heavy dark wash and a light drybrush.
This sets the general tone and it helps with seeing how each color work with the others and fits in the overall contest... now all is left to do is detail painting, for this I use mainly artist's acrylics.
Watch this space for the last episode! :)
Ciao,
Claudio
Monday, 28 January 2013
15mm fortified camp (part 2)
This
is the completed model, all assembled and ready to paint!
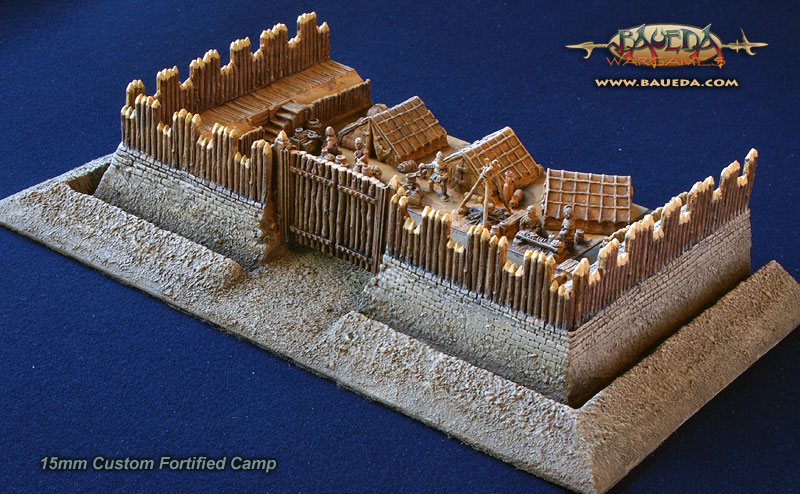
Here you can see some detail of the layered plywood construction, the final 2mm MDF top layer to create a recess for the removable Impetus size base (80x60mm) and the embankment and palisade realized using our 15mm Hoppidus modular fortification system.
MDF is not a very strong material so all exposed edges have been reinforced by soaking them with cyanoacrylate (superglue) this turns it into a much harder, resin-like material.
The insert show some of the camp figures and baggage used, these are going to be released very soon!
Here you can see the insert removed and replaced by an Impetus size base of troops to garrison the
camp.
The gate is removable, I usually mount it on a separate base, but here there is a slope underneath that prevent this, so instead I made two brass guides which are mounted to the side and allow the gate to slid in and out as needed...
Watch this space for part 3!
The gate is removable, I usually mount it on a separate base, but here there is a slope underneath that prevent this, so instead I made two brass guides which are mounted to the side and allow the gate to slid in and out as needed...
Watch this space for part 3!
Ciao,
Claudio
Tuesday, 8 January 2013
15mm fortified camp (part1)
This is a custom order for a fortified camp, made into an open ended circuit, u shaped, without the back side, all realized using our 15mm Hoppidus modular fortification system.
The front of the fortification is 20cm wide (5 x 40mm wide modules, the middle one being the gate opening) and the sides are 12cm (3 x 40mm modules) in depth. This is mounted on a wider sloped base with a 15mm wide ditch cut into it.
The base is made of three layers of 4mm thick plywood topped by a 2mm thick MDF sheet, cut to shape, glued together with generous amounts of extra-strong PVA and left to dry for three weeks under press.
All this to endure the best possible stability of the finished piece and minimize warping with age. The thickness is the minimum necessary to allow for the ditch to be cut into the actual base depth. The inner courtyard is 140mm wide by 90mm deep and has a 80mm x 60mm recess cut into it, 2mm deep. There is no 2mm plywood commercially available here but I managed to scavenge some from the back of an old frame! There is an insert to fit into this recess (shown in place in the picture) which has 2 x 15LEG 15mm legionary tents on it. The tents are not mounted yet, they'll be based with a few supplies to make a nice lively scene...
The third tent is permanently attached to the base. The insert can be removed and replaced by an Impetus size base of troops to garrison the camp.
The green stuff showing in the picture is some squadron putty used to hide the tiny gaps that would otherwise remain at the junction with two pieces...
Now that the main structural work is complete will finish the outer terrain, there is still a gap to cover around the ditch and also the access ramp need to be level. I also going to apply an appropriate finish to the face of the plywood still visible under the embankment and texture the terrain. All this will be done before mounting the palisade, so I can leave the glue to set with the whole piece under press, again to avoid warping due to the tension generated by the glue hardening... once is all set the palisade will go up and then the whole piece will be ready to paint!
Wednesday, 29 August 2012
more scenic bases for FoW!
some of the new scenic bases I just finished, compatible with FoW standard large base size:
should be in production shortly!
Friday, 16 December 2011
rural scenic bases for FoW
This are the new scenic bases for the "rural" series, compatible with FoW standard medium and small base size:
If you are familiar with the old ones you may notice these are much more closely themed, no tree stumps or sandbags on these! The reason is that we are going to introduce two whole new series, Desert and Forest, and those two items will appear (only) on them; this way you'll get the maximum variety and also freedom of choice!
As usually you will get six different small bases picked at random out of the eight design shown above in each pack!
Subscribe to:
Posts (Atom)